
Part deposit
After the bending is completed, the finished part is deposited on a pallet or conveyor, or dropped into a basket. Various settings are used to control this deposit operation:
-
The position, type and orientation of the deposit pallet.
-
The grid of parts on the pallet (rows, columns, layers).
-
The orientation of the part on the pallet.
These settings are controlled mainly from the Deposit panel and Pallet panel that is supporting the deposit operation. These panels are explained below. They are all interconnected by up/down navigation links.
Panels
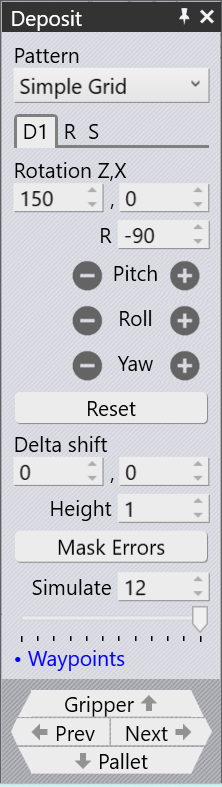
Deposit panel
The deposit panel manages the primary settings for placing a part onto a pallet, basket, or conveyor. Click on the cells like D1 on the bend navigator to open the deposit panel or by clicking on one of the finished parts lying on the deposit pallet.
-
Pattern: Click on the Pattern drop down to select the deposit pattern type. Following are three pattern types available for depositing parts.
-
Simple Grid: This pattern is the most commonly used, and just stacks parts in a rectangular grid on the pallet.
-
Drop to Basket: This pattern is used to drop small parts into a collection basket, using the mechanical gripper.
-
Conveyor: This pattern is used to deposit parts on a part conveyor. This option is essential when long thin parts are deposited on conveyor.
-
-
Deposit tabs: The deposit panel contains several tabs that allow you to configure different aspects of the deposit operations. See the Part 1 settings (D1), Repeat grid (R), Deposit sequence (S) for details.
-
Waypoints: This link brings up the Waypoints editor panel where the robot trajectory during deposit can be fine-tuned.
-
Gripper: This button takes you to the gripper panel and allows you to configure the gripper settings used during the deposit operation. Note that this button is available only when the Simple Grid or Conveyor pattern is used during the deposit operation.
-
Prev and Next: Use these buttons to navigate to the previous and the next operation panels.
-
Pallet: This button takes you to the deposit pallet panel and allows you to configure the settings related to the deposit pallet.
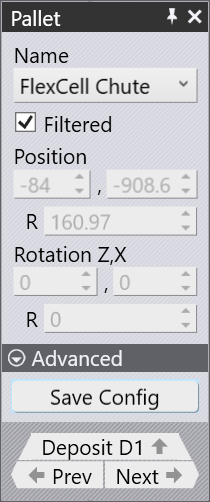
Pallet panel
Use the Pallet panel to select a deposit pallet and set its position in the cell. Click on the pickup pallet to open the Pallet panel.
-
Name: Lists the deposit pallets. To see all available pallets, clear the Filtered checkbox.
-
Position Z, X, R: These fields display the deposit pallet’s position in the machine coordinate system. These fields are not editable, as the pallet position is preset.
-
Rotation Z, X, R: These fields display the deposit pallet’s rotation in the machine coordinate system. These fields are not editable, as the pallet rotation is preset.
-
Save Config: Click the Advanced dropdown to view this option. Saves the current cell configuration as the default for this machine.
-
Prev / Next: Navigate to the previous or next pallet in the cell.
-
Deposit D1: Opens the Deposit panel.
Gripper panel
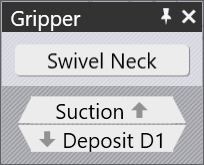
The gripper panel allows you to configure various settings related to the gripper used during the deposit operation. Click on the gripper open the gripper panel or click on the gripper icon in the deposit panel to navigate to the gripper panel.
-
Swivel Neck: This option helps to rotate the Jaw Neck with 180° rotation.
| These gripper and Suction panels are available only when the Simple Grid or Conveyor pattern is selected for the deposit operation. |
Suction panel
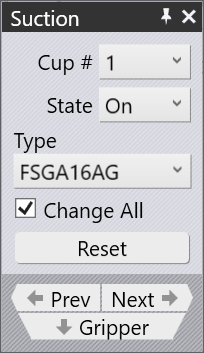
Use the Suction panel to configure the suction cup layout of a gripper. Click any suction cup to open this panel, or use the Suction link in the Gripper panel.
-
Cup #: Selects a suction cup to edit.
-
State: Sets each cup to On or Removed.
-
On: Default state. Cup is connected to the vacuum line and contributes to lift.
-
Removed: Cup is physically removed from the frame. There will be no lift from this cup and no collision occurs. It is useful when a cup falls over a formed feature or collides with the die.
-
-
Type: Changes the suction cup type. By default all cups change together; clear Change All to change individual cups. Note that all cups on a gripper frame must share the same working height.
-
Reset: Restores all cups to their default type and turns them all ON.
-
Prev / Next: Navigate to the previous or next cup. The selected cup is highlighted in blue
-
Gripper: Opens the Gripper panel.