
Troubleshooting
This troubleshooting guide provides a concise, icon-driven reference to diagnose and fix common issues while doing simulation in the Flex Cell CAM. Each table below shows an icon, its meaning, and practical steps to resolve the condition — use the "Methods to resolve the error" column as your primary action list.
Provided below a sample of Bend navigator table with errors:
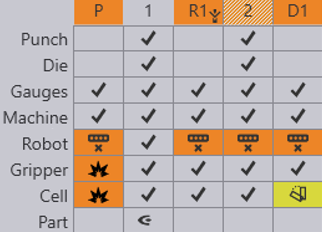
-
Bend navigator can be opened by pressing the Z key.
-
For each bend, the navigator displays several rows of status icons.
-
Icons in uncolored cells → No Errors/Warnings
-
Icons in Orange colored cells → Indicate Errors
-
Icons in Yellow colored cells → Indicate Warnings
-
-
By clicking on a cell that displays error/warning, it takes you to the simulation stage where those specific error/warning occurs.
1. Punch Row
| Icon | Meaning | Methods to resolve the error |
|---|---|---|
|
No error |
- |
|
Punch span too short |
Adjust punch length. |
|
No Punch |
Mount punch. |
|
Punch collides with part |
Change/Adjust the tool
to avoid collision; |
|
Punch collides with die |
Change/Adjust the tool
to avoid collision. |
|
Punch is overloaded beyond its rated tonnage. |
A taller punch must be used or add an adapter. |
|
Punch height is too short |
Adjust the tonnage load. Tooltip shows the actual load. |
|
Punch extends out of the press beam |
Adjust punch length, make sure it does not exceed the press beam. |


2. Die Row
Icon |
Meaning |
Methods to resolve the error |
|
No error |
- |
|
Die span too short |
Adjust die length. |
|
No Die |
Mount die. |
|
Die collides with part |
Change/Adjust the tool to avoid collision; Try changing the bend sequence |
|
Die collides with Punch |
Change/Adjust the tool to avoid collision. Make sure to choose either punch or die with less height. |
|
Die overloaded |
Change the tool having V width
greater than the previous die. |
3. Guage Row
| Icon | Meaning | Methods to resolve the error |
|---|---|---|
|
No error |
- |
|
No back gauges |
Position the gauges properly against the part. |
|
Back gauge collides with punch or die or part. |
Adjust the gauge X position. |
4. Machine Row
| Icon | Meaning | Methods to resolve the error |
|---|---|---|
|
No error |
- |
|
Part collides with floor |
It can be adjusted but lifting the component. But it should not be done. |
|
Back-gauge position exceeds the travel limits |
Position the gauges within the limits. |
|
Robot collides with machine table |
Make sure that the robot hand is away from the machine. Try changing waypoints, joint rotation. |
|
Machine overloaded |
Adjust the thickness of the part. |

5. Robot Row
| Icon | Meaning | Methods to resolve the error |
|---|---|---|
|
No error |
- |
|
Infeasible position (Kinematic error) |
Infeasible
position is that robot cannot reach or achieve the specified position. To
rectify infeasible position error, |
|
Robot axis overtravel |
It can be resolved by changing the interpolate → Linear to Axis or vice versa; insert waypoints and adjust values. |
|
Robot collides with machine components |
Move the
waypoints to adjust the travel path. |

6. Gripper Row
| Icon | Meaning | Methods to resolve the error |
|---|---|---|
|
No error |
- |
|
Gripper collides with cell components |
Adjust gripper position to avoid collision. |
Gripper collides with floor |
Adjust gripper position to avoid collision. |
|
|
No material under suction cup |
Adjust gripper position to ensure material is under suction cup. |
|
Gripper overloaded |
Change the gripper according to the part. |

7. Cell Row
Icon |
Meaning |
Methods to resolve the error |
|
No error |
- |
|
Robot collides with cell components |
Adjust waypoints to avoid collision. |
Gripper collides with cell components |
Adjust gripper position to avoid collision. |
|
Gripper collides with floor |
Adjust gripper position to avoid collision. |
|
|
Deposit stack unstable |
Ensure the deposit stack is stable by adjusting the deposit position. |
